
Magic Lantern, for Canon cameras, really is magic. It opens up so many useful features which I use daily. Big thanks to all the developers involved who give up their time to give us creatives these amazing tools, you guys are geniuses.
Here’s some of my most used Magic Lantern features, why I find them useful, and how to use them. If you’re still on the fence about whether to install Magic Lantern, maybe the info here will sway you. TL;DR – just install it and have a play around, it’s awesome : )
Nb. This is based on my current setup, a Canon 6D, but should generally be the same.
Crop Marks
While Canon give us grid overlay options, the option Magic Lantern offers to create our own crop mark overlays is something I have found to be exceptionally useful. For me, this really comes into its own when shooting timelapses and hyperlapses. After a few iterations, I have designed myself a set of custom crop marks which really help line things up.
To access the Crop Marks tool from the main menu:
- Overlay (histogram icon) > Cropmarks
Magic Lantern comes with some pre-made crop marks, but if you would like to make your own, and even make lighter coloured ones, be sure to check out my tutorial: Magic Lantern Custom Crop Marks (Black or White).
Timelapse Preview
I only discovered this useful feature recently, it was tucked away in the Image Review settings.
If you shoot timelapses this allows you to preview frames you have shot as a animated sequence, so instead of having to hold down the scroll wheel button, or continuously tap right and left, you simply depress the ‘Set’ button, flick the scroll wheel, let go – and hey presto, you can preview your sequence hands free!
Nb. Using this feature will cycle through all the images you’ve shot on your card and loop continuously until you press the ‘Play’ button to stop it.
To set this up:
- Prefs (spanner icon)
- Image review settings > Play mode actions > Action type > Timelapse Play
- I found this setting to work the best: Trigger key(s) > Set+MainDial
Intervalometer
For anyone producing timelapse work this is the daddy of all the features and worth the Magic Lantern install alone. The ability to have a built-in intervalometer is priceless. Having said that, I really shouldn’t have to say that – it should be built-in as standard, looking at you Canon…
Nothing more to say here, it does exactly what it says on the tin and works flawlessly.
- Shoot (camera icon) > Intervalometer
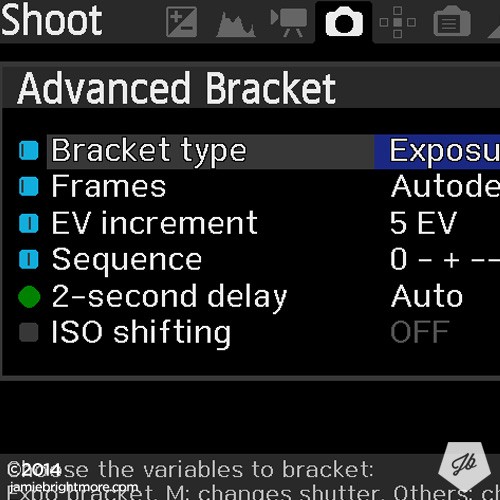
Bracketing + Intervalometer
Advanced Bracketing once again supersizes your Canon camera’s abilities. This time to excel in creating images for HDR processing by offering you these useful features:
- Bracket Type; Exposure (M, Tv/Ae), Exposure (Flash), DOF (Aperture)
- Frames; All the way up to 12! + Autodetect
- EV Increment; 0.5–8EV
- Sequence order / type
- ISO shifting
For me, the a seriously useful thing here is being able to set up bracketing and the intervalometer, enabling me to produce stellar HDR timelapse sequences.
You can find the feature here:
- Shoot (camera icon) > Advanced Bracket
-
Adv. Bracketing -
Ghost Overlay -
Colour Scheme
Ghost Image
This is a great tool if you ever need to re-frame a shot after you’ve moved about -or- revisit a location to get the exact same framing.
Simply put, it allows you to overlay a previous taken shot (onto the Liveview overlay) so you can line things up precisely. If you are revisiting a location, simply load an image onto your card before you leave ready for framing when you get to your location.
To use this feature:
- Overlay (histogram icon) > Ghost Image
- Toggle ‘Info’ to ensure the ML overlay is selected
- Press the ‘Play’ button and select the image you wish to overlay as a ghost image
- Press the ‘Live View’ button
Your image should now appear ghosted. If it is off centre for some reason, you can use the dial buttons to reposition the ghost image.
Magic Zoom
The Magic Zoom feature helps you manually focus your lens precisely without fumbling around with the standard x5/x10 zoom process.
Once activated, the Liveview overlay will display a little inset window showing you a fully zoomed portion of your shot so you can focus your lens on any detail you choose. It even provides visual confirmation when the best focus is achieved.
There are a few neat options, such as;
- Trigger mode. Choose how to access the Magic Zoom.
- Size; Small, Medium, Large, FullScreen
- Position; Focus Box, Top-Left, Top-Right, Bottom-Right, Bottom-Left
- Magnification; 1:1, 2:1, 3:1
- Focus confirm; Green Bars, SplitScreen, SS ZeroCross
You can find the feature here:
- Overlay (histogram icon) > Magic Zoom
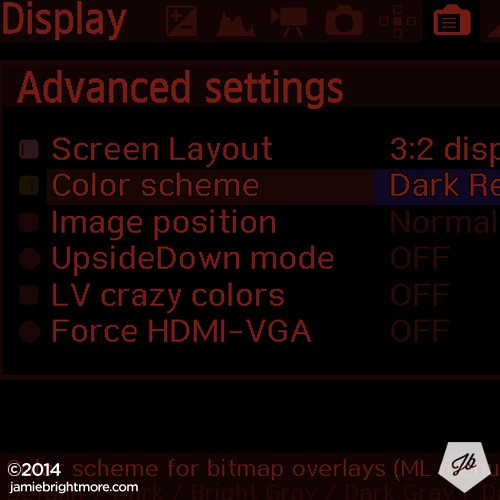
Colour Scheme
This is a nice touch, options for changing the screen colour. I use the Dark Red option when shooting at night. Options are; Default, Dark, Bright Grey, Dark Grey, Dark Red, Dark Green.
- Display (camera screen icon) > Advanced Settings > Colour Scheme
You can use the left and right scroll wheel buttons to quickly cycle through the options.
Conclusion
Magic Lantern is amazing. The tireless efforts of the development team involved will no doubt continue to empower us with useful tools for our Canon cameras.
What are your most used Magic Lantern features and uses? Let me know in the comments.
Cheers : )
SUBSCRIBE FOR FRESH CONTENT
Follow me on social media for updates.