Quickly navigating the camera’s menu
The menu system on SONY A7 cameras can be somewhat awkward and fiddly to traverse, making it tricky to quickly find what you need. I wish SONY would redesign the UI. How about; adding some colour coding (ala Canon), better default groupings, and a customisable ‘Favourites’ tab you could shove right at the start for easy access. It could be so much better.
Here’s a quick access chart showing the locations of useful settings:
Nb. Menu location column: first number is the tabbed menu, second is the sub menu number.
| SETTING | MENU LOCATION |
|---|---|
| File Format / Bitrate | 1 : 2 |
| Zoom | 1 : 6 |
| Audio Recording ON/OFF | 1 : 8 |
| SteadyShot | 1 : 8 |
| Memory Recall / Memory | 1 : 9 |
| Finder (EVF) / Monitor toggle | 2 : 3 |
| Zoom Setting (Optical / ClearImage / Digital) | 2 : 3 |
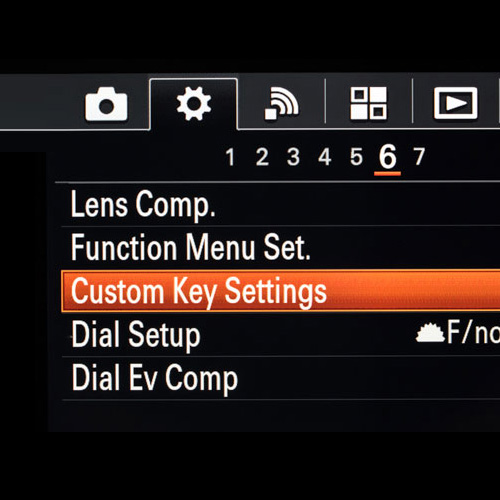
| Function Menu Set | 2 : 6 |
| Custom Key Settings | 2 : 6 |
| Audio signals (beeps) | 6 : 1 |
| Power Save Start Time | 6 : 2 |
| NTSC / PAL | 6 : 3 |
| HDMI Settings | 6 : 3 |
Memory Recall setup
Setting up the memory recall functions is handy for run-and-gun situations. I have mine set to 4K and HFR respectively. To customise the mode dial [1, 2]:
- Set your camera exactly how you’d like it, shutter seed, aperture, all settings, etc.
- From the menu locate and click ‘Memory’ [1 : 9]
- Choose either ‘1‘ or ‘2‘ and click the control wheel center button to save
- Test the mode dial recalls your desired settings
You can also add x4 more presets, M1, M2, M3, M4 using the same steps as above, but by selecting one of those at step 3.
Nb. a quick way to access all the presets is to spin toggle the mode dial 1 and 2 which brings up the Memory Recall page. To access these, I also have the ‘Shoot Mode’ set in my custom Function Menu – but this way is far quicker.
-
Menu System -

Mode Dials -
Log Curves
Record 4K with APS-C lenses (Digital Zoom ‘hack’)
This is a really nice hack for shooting 4K using APS-C lenses:
- Set ‘File Format’ [menu 1 : 2] to 4K
- Switch ‘Zoom Setting’ [menu 2 : 3] to ‘On:ClearImage Zoom’
- Set ‘Zoom’ [menu 1 : 6] to the desired amount using the rear dial
I use either x1.3 or x1.4. The later completely eliminates the vignetting. I also have the ‘Zoom’ function allocated to the C1 button for quick access. You can assign this in the ‘Custom Key Settings’ [menu 2 : 6].
The ClearZoom feature is great, I’ve not noticed any loss of image clarity.
Shutter speed for HFR
Using a shutter speed of at least 250 will reduce the motion blur giving cleaner slow motion.
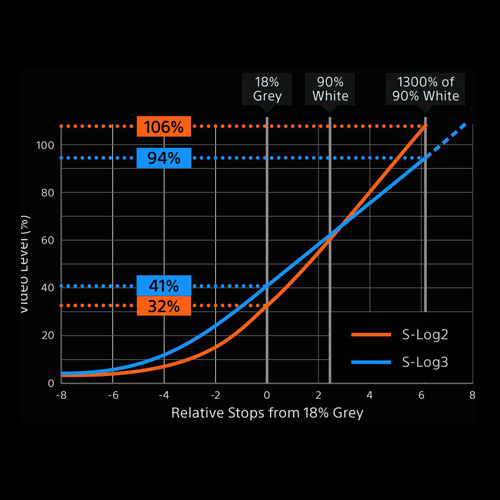
Exposing SLOG 2 / 3
When shooting in strong light using a log profile, an ND filter is crucial. This is because the lowest ISO will be 1600 and the light will be uncontrollable without one.
Alternatively, you can use a profile which allows a lower ISO, like Cine4, but this will sacrifice dynamic range.
When measuring exposure with the A7Sii it’s best to keep your IRE levels above 40 to avoid noise in the shadows. A good method is to set custom Zebras [menu 2 : 1] rather than using the histogram, which is not very accurate for exposing video. I have mine set to 107 IRE and 40 IRE, this way I can quickly find a good balance between high / mids / lows.
Tweaks for using the A7Sii with a gimbal
Always turn off SteadyShot (in camera stabilisation) when using a gimbal. If you leave it on you can expect glitchy results.
If your setup requires more clearance near the gimbal’s tilt motor, you can physically remove the EVF eyepiece which should help.
Custom White Balance
Firstly, you can only set a custom white balance in manual ‘M’ mode. Secondly, if you have a Picture Profile set the camera will throw an error, so you need to temporarily turn this off before setting a custom white balance.
- Set mode dial to ‘M’
- Change ‘Picture Profile’ [menu 1 : 5] to ‘None’
- Under White Balance choose ‘Set’
- Capture your grey card, etc. by clicking the control wheel center button
- Choose a register slot by clicking the control wheel center button again
- Switch back to desired Picture Profile, PP7, etc.
Lastly, if you have Memory Recall set up (as described above), the only way to store a custom white balance is to do the steps above, then re-save the Memory position with the camera set to ‘M’ and your custom white balance register selected.
This is not only a ballache, but means you get stuck in ‘M’ mode. If anyone knows of a workaround please drop a comment below.
Conclusion
Hopefully this is useful for anyone starting out, or maybe you already use an A7Sii and learnt something new or have more to add? Let me know down below.
SUBSCRIBE FOR FRESH CONTENT
Follow me on social media for updates.
Also http://www.Samanthaisom.com (samiampictures) Thankoyu very much. I didn’t NOT think about shutting off the internal IS when using my gimbal. OMG this will be a game changer thankyou! As well, I’m going to check on that custom white balance. I normally do shoot with PP off at least when shooting underwater, but custom profile does not really work uw. that sounds silly I should know that right, well not really as canon seems to do a better job with custom white balance uw, but for some reason my sony a7sii is a nightmare in this mannor. any ideas on that?